Predict Titanic survival model using only one Feature scores 82%
The sinking of the Titanic is one of the most infamous shipwrecks in history.
On April 15, 1912, during her maiden voyage, the widely considered “unsinkable” RMS Titanic sank after colliding with an iceberg. Unfortunately, there weren’t enough lifeboats for everyone onboard, resulting in the death of 1502 out of 2224 passengers and crew.
While there was some element of luck involved in surviving, it seems some groups of people were more likely to survive than others.
In this challenge, we ask you to build a predictive model that answers the question: “what sorts of people were more likely to survive?” using passenger data (ie name, age, gender, socio-economic class, etc).
Python
PyTorch
XGBoost
Math
Author
Shivam Chhetry
Published
September 02, 2022
Modified
October 12, 2023
The Challenge
The sinking of the Titanic is one of the most infamous shipwrecks in history.
On April 15, 1912, during her maiden voyage, the widely considered “unsinkable” RMS Titanic sank after colliding with an iceberg. Unfortunately, there weren’t enough lifeboats for everyone onboard, resulting in the death of 1502 out of 2224 passengers and crew.
While there was some element of luck involved in surviving, it seems some groups of people were more likely to survive than others.
In this challenge, we ask you to build a predictive model that answers the question: “what sorts of people were more likely to survive?” using passenger data (ie name, age, gender, socio-economic class, etc).
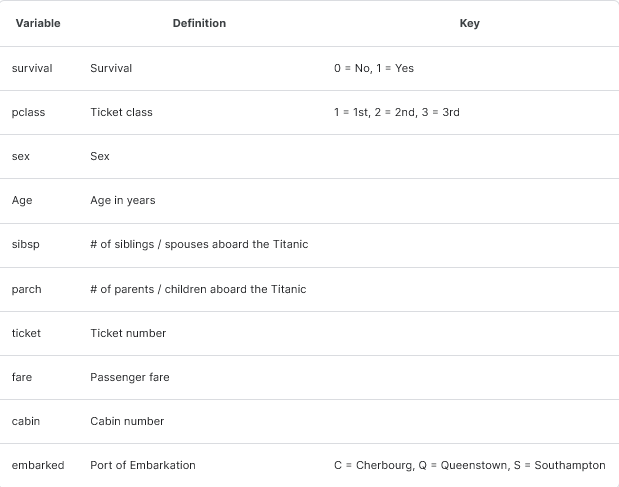
What Data Will I Use in This Competition?
In this competition, you’ll gain access to two similar datasets that include passenger information like name, age, gender, socio-economic class, etc. One dataset is titled train.csv and the other is titled test.csv.
Train.csv will contain the details of a subset of the passengers on board (891 to be exact) and importantly, will reveal whether they survived or not, also known as the “ground truth”.
The test.csv dataset contains similar information but does not disclose the “ground truth” for each passenger. It’s your job to predict these outcomes.
Using the patterns you find in the train.csv data, predict whether the other 418 passengers on board (found in test.csv) survived.
Dataset Description
The data has been split into two groups:
training set (train.csv)
test set (test.csv)
The training set should be used to build your machine learning models. For the training set, we provide the outcome (also known as the “ground truth”) for each passenger. Your model will be based on “features” like passengers’ gender and class. You can also use feature engineering to create new features.
The test set should be used to see how well your model performs on unseen data. For the test set, we do not provide the ground truth for each passenger. It is your job to predict these outcomes. For each passenger in the test set, use the model you trained to predict whether or not they survived the sinking of the Titanic.
We also include gender_submission.csv, a set of predictions that assume all and only female passengers survive, as an example of what a submission file should look like.
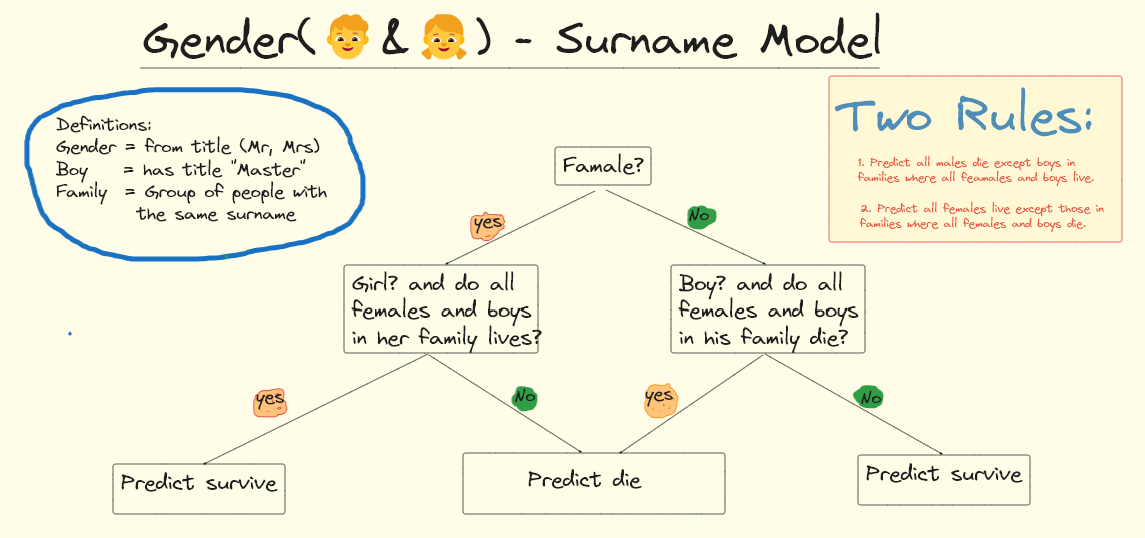
Below is the main concepts blueprint which I'll explain how it works.
Let's begin with the gender model
If we just predict females survive and males perish, we cross validate at 78.6% and receive a public leaderboard score of 76.6%.
      # The gender model achieves a 76.6% leaderboard score
      import pandas as pd

      # Read the CSV file
      test = pd.read_csv("../input/titanic/test.csv")

      # Update the 'Survived' column based on the 'Sex' column values
      test['Survived'] = 0  # Default value for all rows
      test.loc[test['Sex'] == 'female', 'Survived'] = 1  # Update 'Survived' to 1 where 'Sex' is female

      # Create a DataFrame for submission
      submit = pd.DataFrame({'PassengerId': test['PassengerId'], 'Survived': test['Survived']})

      # Write the submission DataFrame to a CSV file
      submit.to_csv("genderModel.csv", index=False)
To improve upon the gender model, we need to determine which males survive and which females perish. By analyzing the Titanic data, we find that many male survivors are among the youth, namely 52.5% = 21/40 of males under 16 years old survive. And most females who perish are among Pclass==3 passengers, namely 50% = 72/144 of Pclass==3 females perish.
      # Read the CSV file
      train = pd.read_csv("../input/titanic/train.csv")

      # Count the number of survived males under the age of 16
      survived_male_under_16 = train[(train['Sex'] == 'male') & (train['Age'] < 16)]['Survived'].value_counts()
      print("Survived males under 16:")
      print(survived_male_under_16)

      # Count the number of survived females in Pclass 3
      survived_female_pclass_3 = train[(train['Sex'] == 'female') & (train['Pclass'] == 3)]['Survived'].value_counts()
      print("\nSurvived females in Pclass 3:")
      print(survived_female_pclass_3)
There were 21 males under the age of 16 who survived.
There were 19 males under the age of 16 who did not survive.
Survived females in Pclass 3:
There were 72 females in Pclass 3 who survived.
There were 72 females in Pclass 3 who did not survive.
CSS tip
These listing cards looked great on a wide screen but as the screen got narrower (think mobile device) the listing cards just became narrower and narrower 😂. I took care of this by tweaking the CSS so that the cards would wrap.
The last structural piece I wanted to recreate from Apéro was a contact form. I saw a great example on Michael McCarthy’s Tidy Tales blog, site and did a little repo-diving to get ideas on how to organize the content. I ended up using the Bootstrap CSS Grid to layout the content exactly how I wanted to. See what I mean about Quarto offering a lot of flexibility in content layout?
Bones of the contact page
contact.qmd
<!-- start grid -->::: {.grid} <!-- column for the body text -->::: {.g-col-5}# Send me a note< Body text>< HTML code for social media icons >:::<!-- column for spacing -->::: {.g-col-1}:::<!-- column for the form -->::: {.g-col-6}< HTML embed code provided by Formspree >::::::<!-- end grid -->
Ok so once I figured out how to incorporate all of the structural elements I wanted, I had to deal with the (relatively small) challenge of porting my old posts to Quarto. Quarto was designed to be compatible with existing R Markdown documents, but I didn’t actually want it trying to re-render old R Markdown files so I had Quarto ignore those completely2 and render the Markdown version of each post instead3. There were also a handful of YAML fields that I had to remove or modify to play nicely with Quarto:
Remove layout: (e.g., layout: single-sidebar)
Remove publishDate
Remove lastUpdated
Remove featured (e.g., featured: yes)
Merge categories with tags and keep tags
Add image (e.g. image: featured.png)
Partials
If you’ve used Apéro you might have come to love the cute button links created from the links field in the YAML, like the one at the top of this post, pointing to the Quarto docs.
links:-icon: journal-textname: Quarto Docsurl: https://quarto.org/docs/websites/
Well, these button links are not ready-made by Quarto, but lucky for me (us!), Garrick figured out a way to bring them in right where we I need them. I repo-dived and found that he modified an HTML partial for title blocks, which controls the layout and styling of the post title, description, and tags, shown at the top of the page.
The original title block partial has sections controlling the placement and styling of text provided in the title, subtitle, authors, date, and abstract fields of the document YAML.
As an example, line 2 might read: If there’s something in the title field of the YAML, give it a level 1 heading and style it with CSS class .title
The modified partial includes some additional sections but I’ll break down the one for links.
There’s more styling going on in the modified partial, but starting on line 6, the structure for the link buttons is effectively:
If the links field is populated in the YAML, create an HTML container styled by some CSS, and give it some specific HTML properies.
Then, for each sub-item of the links field: create a hyperlink from the url sub-item, apply some CSS classes to create the button, add a Bootstrap icon defined by the icon sub-item, and finally add hyperlink text defined by the name sub-item.
I may have published my brand new Quarto site in the fall of 2023, but I had actually taken my first go at porting it from Apéro in the fall of 2022. In an attempt to replicate the styling of my old site I tried to strong-arm my Quarto site into using tachyons4, and I wrote way too much custom CSS in the process 😩.
Something didn’t feel right about it, so I took a break and came back to my in-progress Quarto site several months later – outside of the Quarto release craze, and with the perspective that I wanted to work with the built-in theming capabilities, rather than against them 😌. This time around I leaned into the Bootstrap SCSS variables, and added custom styling as needed.
To be more specific, I created a custom theme 5, and populated it with definitions for some of the built-in Bootstrap Sass variables. If you poke around my custom theme, you will notice that some colors are defined by color variables that start with $spc-. These are variables pointing to colors that I’ve defined elsewhere, and they can be replaced with a hex code of your choosing! 🎨
The Sass variables listed in the documentation got me pretty far, but there were still elements of my site using default colors and styling that I wanted to change. So I repo-dived to learn about additional Quarto Bootstrap variables and rules:
To give you an example, someone in the Quarto Discussions forum asked how to set the color of block quotes, figure captions, and outlines, something not defined in the documentation. One of the replies suggested using the browser’s inspector to find the CSS rule applied to the element in question, we’ll say the figure caption, and then looking at how Quarto implemented that rule. I’ll make that process a little more explicit here and use the figure caption as an example:
Use the browser inspector to highlight a figure caption
The inspector will reveal that the element is styled by CSS class .figure-caption
Run a keyword search for “figure-caption” in the Bootstrap variables file. This will yield no results 🤔
Run the same keyword search in the Bootstrap rules file – success! We have a clue, which is that .figure-caption is styled by a variable named body-secondary 🔍
Define your own body-secondary color variable in your custom theme file
assets/custom-theme.scss
/*-- scss:defaults --*/$body-secondary: #6C757D;
Enjoy the fruits of your labor as a CSS detective 🕵🏽♀️
Individual page styling
In some cases, I wanted to style individual pages differently than I was styling my entire site. Poking around Garrick’s repo (again!), I learned that you can reference CSS stylesheets in the YAML of any particular document. I used this approach to separately style my Home, About, and listing pages.
Ok one of the aesthetic pieces I was excited to add to my Quarto site that I didn’t have in my old site is a featured image at the top of each post. I was inspired by Matt Worthington’s site while I was reading one of his excellent blog posts on a workflow for interactive maps in R – I loved that the title block included an image in the background! 🤩
After some web inspecting and repo-diving in Matt’s website repo I came up with some styling that I could apply to the title block of each post. It took modifying the title block partial described earlier, and adding some CSS to my custom theme.
For styling that I wanted to apply uniformly to all post title blocks, I created a .figured-image CSS class in my custom theme:
Don’t miss the code annotations for this code chunk! 👀 Such a cool feature!
Add shadowing that gives the appearance of a dark overlay
Alright, but why didn’t I use a background-image property to define the image? If I define the background image in my .featured-image class then that is the image that’s going to show up in all of the posts across my site. I want the title block of each post to display the featured image belonging to each individual post. That’s where the partial comes back in.
Along with some other CSS classes, the div container for the title block is styled with the featured-image class defined earlier, using the class= property. In addition, the div itself is styled using the style= property, and that’s where I defined the background image. The partial will look for a featured image of some kind either in the same folder as the post, or in the parent folder, and display it in the background of the title block.
This is a hacky way of getting what I really want which is for the partial to check for a featured image in the order I specify and then just stop once it finds one. As it stands right now, the styling attempts to layer on all three images, with the first image on the top and the last image on the bottom. This means that I get a warning every time I preview or render my site because the partial can’t find one or two of the other urls, but I’m ok with that!
Example warning
/blog/2023-09-29-hello-quarto/featured.png (404: Not Found)
Setting up redirects
Resources
Last but not least, I can’t finish this blog post without talking about the necessary task of redirecting old Apéro URLs to new Quarto ones 6. Many thanks to Danielle Navarro and Tom Mock for documenting their solutions for automatically generating a _redirects file with each render of the site.
I adapted their code to (1) fit my site, which has multiple folders of posts that all need redirects, and (2) combine these automatically generated redirects with ones I had already defined manually. I placed this code within my home page index.qmd file and I specified freeze: false in the YAML so that the code would run each time I rendered the site. The following sections will take a look at the code piece by piece.
Importing manual redirects
The first step imports the manually-defined redirects that I had already been using in my old site. These redirects primarily have the task of redirecting my rbind.io domain to my custom domain silviacanelon.com.
The next step defines a function that obtains a list of subdirectories, iterates it over the four groups of posts in my site (blog posts, talks, publications, and projects), and compiles the files into a data frame.
index.qmd
# function: obtain list of post pathslist_paths<-function(folder){posts<-list.dirs( path =c(here::here(folder)), full.names =FALSE, recursive =FALSE)|>tibble::as_tibble_col(column_name ="path")|>dplyr::mutate(folder =folder)}# define post foldersfolders<-c("blog", "project", "publication", "talk")# list post paths by folderposts<-purrr::map(folders, list_paths)|>purrr::list_rbind()head(posts)
Defining redirects
This next chunk removes the month and day from year-month-day-slug so that I’m left with shorter paths with the format year-slug, and uses these paths and the folders they are housed in to create redirects.
The resulting redirects will point the short year-slug link to this blog post:
# extract short paths and create redirectsposts<-posts|>dplyr::mutate(# extract the year-slugs short_path =stringr::str_remove(path, "(?!\\d{4}-)\\d{2}-\\d{2}-(?!\\d)"),# create short paths short_path =paste0(folder, "/", short_path),# create lines to insert to a netlify _redirect file redirects =paste0("/", short_path, " ", "/", folder, "/", path))head(posts)
Writing redirects file
The last step takes the redirects from the data frame produced in the previous step, combines them with the manual redirects, and writes them to a new text file _redirects. This file is written into the _site folder where my Quarto site is rendered, and where Netlify will know to find it.
index.qmd
# extract redirectsredirects<-posts$redirects# combine with manual redirectsredirects_combined<-c(manual_redirects, redirects)# write the _redirect filewriteLines(redirects_combined, here::here("_site", "_redirects"))
Fin
Now that it’s been over a year since Quarto made its debut, there are so many wonderful blog posts walking folks through how to create a Quarto site. My hope is that the notes I took in this blog post help provide some stepping stones for folks making the transition from blogdown sites, and offer some ideas for what is possible with the flexibility of this new publishing framework. I, for one, am looking forward to growing my digital garden with Quarto tools 🌱.
Don’t skip this step! People will almost certainly have shared one or more of your posts somewhere on the internet, and it helps everyone if you can point them to the right spot↩︎